
If you are searching for a festive red, white, and blue cookie to make for a patriotic summer holiday like the Fourth of July, these cookies are guaranteed to be a crowd pleaser! They are absolutely the best thumbprint cookies with icing I have ever had, and are adaptable to fit any holiday!
These Patriotic Thumbprint Cookies have both almond and vanilla extracts mixed into the dough, creating an absolutely delicious flavor combination. There is also amazing texture with a crunch from the nonpareils and a sweet vanilla icing nestled on top. The cookies are also super easy to make, adding just one more reason to love them!

Recipe used to make the Patriotic Thumbprint Cookies with Icing:
Sprinkle Thumbprint Cookies by The Rose Wife
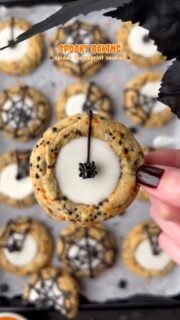
This colorful thumbprint cookie recipe has been saved in my recipe folder for quite some time simply from how beautiful the photos are on Kindra’s blog, The Rose Wife. I knew I just had to make them and immediately the wheels started turning thinking about the various colors I could use to have them adapt to any holiday (you will probably see me make these again for Halloween!).
I am still in awe of how a sugar cookie could be elevated to this level! The almond flavor is divine, and the vanilla icing adds the perfect touch of sweetness without overpowering the cookie. Also – the texture…I may repeat myself saying how much that component stood out to me!
The recipe was followed exactly, however I used nonpareils instead of jimmies and clear vanilla flavoring instead of vanilla extract in the glaze. More details on this below!

Tips for making the Thumbprint Cookie Dough:
Use imitation almond flavor if worried about a nut allergy:
- Whether you or someone you know has a sensitivity to nuts, or you want to play it safe when giving these cookies out, using almond flavor (and not almond extract) solves this concern! I have a sensitivity to nuts myself, and have been using McCormick imitation almond flavor in all of my bakes that call for almond. Myself and others haven’t noticed any difference from the flavor you get from pure extract!
Use a cookie scoop:
- To ensure all cookies are the same size and bake evenly, a cookie scoop is such a game changer! If you are on the search for some, I absolutely love these cookie scoops and not using my food scale to ensure the cookies are all the same size. I measured 1 oz dough balls using the smallest scoop and the recipe made 26 cookies for me!

Substitute nonpareils for sprinkles:
- This step is completely optional but I cannot recommend it enough for the texture it gives! I am huge on texture when it comes to food and these patriotic sprinkles add a delectable crunch to every bite! I used the same 1/2 cup amount the recipe calls for.
Make the well/indentation while the cookies are piping hot:
- Immediately after pulling the cookies from the oven, use your tool of choice to press down into the cookie surface. If they even barely start to cool, the cookies will crack as you press into them.
- I used the back of a tablespoon I got from Target to make the indentation and the size was perfect!

Tips for making the Vanilla Icing:
To keep the icing bright white, use clear vanilla flavor.
- Since the glaze is the main “white” component of the red, white, and blue cookies, I wanted to keep it as bright and can be! To do this, I reached for Watkins clear vanilla flavor which I hadn’t used since making a replica Momofuku Milk Bar cake. This is the vanilla flavoring Christina Tosi uses in her famous Milk Bar cake (details on this here) for the actual cake, crumbs, and frosting! It gives a delicious, childhood birthday cake flavor that you just can’t get from pure vanilla bean extract or paste.
Sieve your powdered sugar:
- Taking the extra few seconds to sift the powdered sugar helps ensure a super silky and smooth glaze without any lumps!

How to Decorate the Patriotic Thumbprint Cookies:
Decorating these cookies is as easy as getting your hands on some colored candy melts (or white chocolate and food coloring) and festive red, white, and blue sprinkles!
Caution! – If coloring white chocolate, be sure to use the proper food coloring. Oil-based coloring must be used when tinting chocolate and candy melts. Water-based food colors can cause the chocolate/candy to seize (I’ve experienced this in the past).
The red and blue white chocolate drizzle:
To make the drizzle, simply melt white chocolate and add the food coloring (or, use colored candy melts)! I love using white chocolate Ghirardelli Melting Wafers since they melt down so easily and have a silky consistency. You could also melt down white chocolate chips, but I find this to result in a thicker texture that doesn’t drizzle as well. I used white chocolate melting wafers for the blue drizzle, and white chocolate chips for the red as I ran out of the wafers.
To make the colors:
- Red: Add red food coloring to the melted white chocolate until desired hue is reached.
- Blue: Blue was a bit more difficult and I mixed quite a few colors together. I wanted more of a royal blue but am happy with the color I got! I also used blue with a touch of black and red.
How to drizzle the chocolate onto the cookies:
- First, ensure your cookies have fully cooled and the vanilla icing has set on top.
- Next, fill a piping or ziplock bag with the colored chocolate and cut a small tip off one corner of the bag.
- Lightly drizzle one edge of the cookie with the chocolate.
- Place your sprinkles while the drizzle is still wet.

If you like this recipe, I think you’ll also love:
- Patriotic Cherry Cupcakes with Almond Buttercream
- Patriotic M&M Cookies
- Crumbl Circus Animal Sugar Cookies
- Torched Crème Brûlée Cupcakes

Patriotic Thumbprint Cookies with Icing
Course: DessertCuisine: AmericanDifficulty: Easy26
cookies30
minutes10
minutes15
minutes55
minutesThese patriotic red, white, and blue thumbprint cookies have texture, a delicious chew, and a sweet vanilla icing – simple to make and SO delicious! They are also easily adaptable to make festive for any holiday.
Ingredients
1 batch sprinkle thumbprint cookies by The Rose Wife Bakes
White chocolate and oil-based coloring or colored candy melts
Red, white, and blue nonpareils
Red, white, and blue candy star candy sprinkles (I found mine at Walmart)
- Helpful Tools:
Directions
- First, make the thumbprint cookie dough and substitute red, white, and blue nonpareils for sprinkles.
- Next, bake the cookies.
- As soon as you remove the cookies from the oven, immediately use your tool of choice to make a small well/indentation in the center of each cookie. I used the back of a flat-bottomed tablespoon.
- Allow the cookies to fully cool while you make the glaze. To keep the glaze bright white, use clear clear vanilla flavor instead of vanilla extract.
- Fill the cooled cookies with about a teaspoon of the glaze.
- Allow the glaze to set, and then drizzle one edge with your colored white chocolate.
- While the drizzle is still wet, add a sprinkle of patriotic nonpareils and a few candy stars.
- Allow the drizzle to harden and enjoy!
Notes
- Make the well/indentation in the cookie as soon as they are pulled from the oven. If they have a chance to cool, they will crack as you press into them.
- Sieve your powdered sugar to ensure the glaze will be smooth and without lumps.
- Use oil-based food coloring to color your white chocolate. Using water-based can cause the chocolate to seize and be unusable.
Pin for later!


If you make this dessert or have any questions, please leave a comment below! I absolutely love hearing when others are inspired to step into their kitchen and try out something new.
Happy Baking!
XOXO,


Can this be made gf?
Hi Julie,
I’m not too familiar with gluten free baking so I don’t want to lead you astray. If you head over to the recipe developer’s site (or her instagram for direct communication), she may be able to help! https://www.therosewife.com/blog/sprinkle-thumbprint-cookies
Your blog is just beautiful! I love how well thought out and detailed everything is, and you make it so easy to find all the supplies and ingredients. You inspire me to want to try new recipes that I would have otherwise thought might have been too challenging 🙂 Bravo on your beautiful photos!!!!! I’ll be visiting your blog often 😀😀😀.
That makes me so incredibly happy to hear!! Also, thank you so much for the amazing compliments! I can’t wait for you to try them out 😀